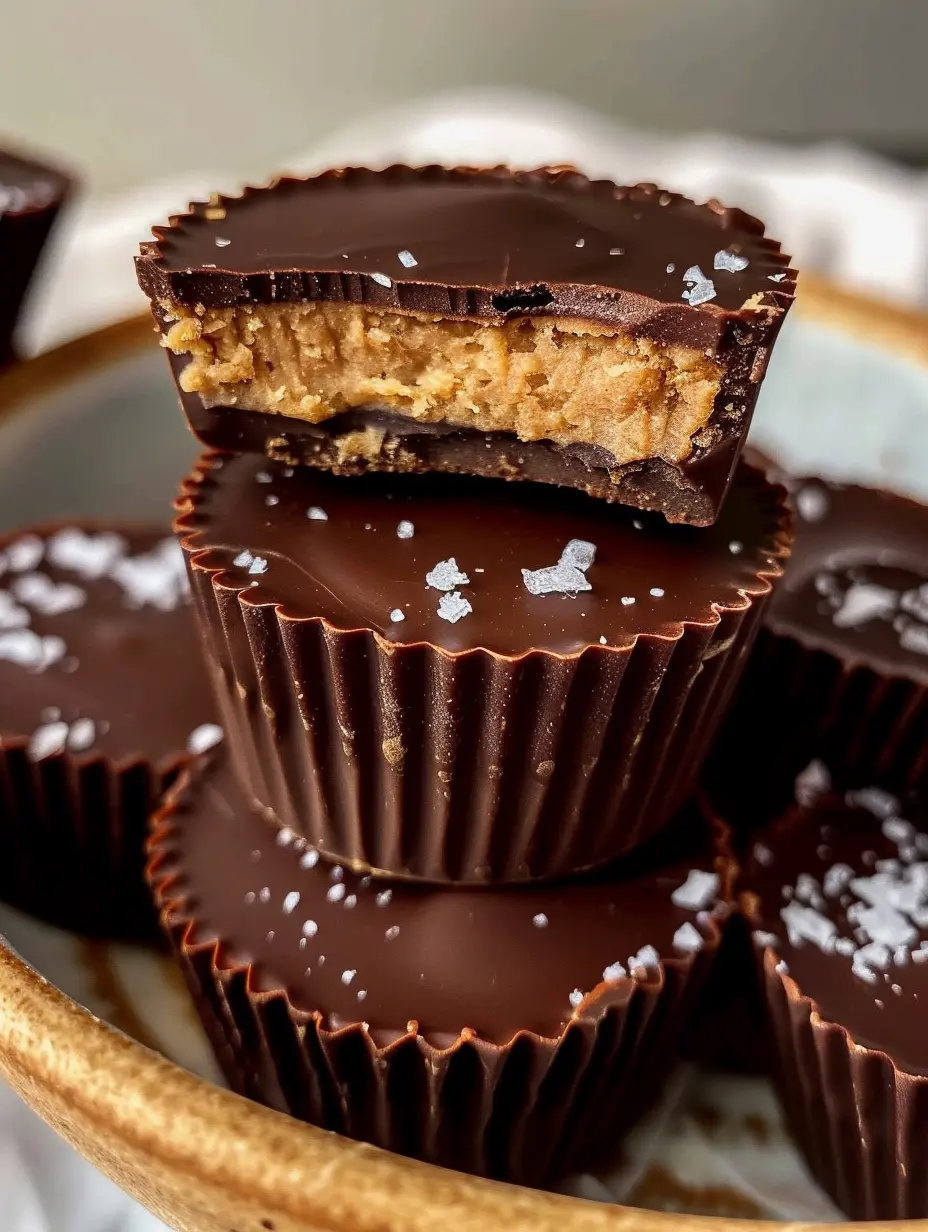
Craving a sweet treat that satisfies your taste buds and supports your health goals? Look no further than these delicious Peanut Butter Protein Cups. This simple recipe transforms classic chocolate and peanut butter into a nutrient-packed snack that feels like an indulgent dessert. Perfect for a post-workout boost, an afternoon pick-me-up, or a healthier dessert option, these homemade cups are incredibly easy to make.
They require no baking, just a few wholesome ingredients and about 15 minutes of active prep time. Let’s explore how to create this crowd-pleasing, protein-rich treat in your own kitchen.
Why Make Your Own High-Protein Dessert?
Store-bought protein bars and snacks are convenient but often loaded with artificial sweeteners, preservatives, and excess sugars. By making your own Peanut Butter Protein Cups, you control every ingredient. You can ensure the quality of the protein, choose natural sweeteners like pure maple syrup, and select high-quality chocolate. This recipe delivers a perfect balance of healthy fats, protein, and complex carbohydrates, making it a far superior option to processed sweets.
For more inspiration on adding protein to your diet, check out our guide to 16 high-protein recipes for a healthy boost.
Ingredients and Halal-Friendly Substitutions
The beauty of this recipe lies in its simplicity and adaptability. Here is your shopping list, along with safe and effective substitution options. We have critically reviewed all ingredients to ensure they meet dietary requirements, replacing any non-compliant items with wholesome alternatives.
Core Ingredients
- Natural Creamy Peanut Butter (⅔ cup): Opt for a brand with only peanuts (and maybe salt) listed in the ingredients. Avoid those with added sugars or hydrogenated oils. Almond butter or sunflower seed butter are excellent alternatives for those with peanut allergies.
- Vanilla Protein Powder (⅓ cup / 30g): You can use plant-based (like pea or rice protein) or whey protein powder, depending on your dietary preference. Ensure it’s a brand you enjoy the flavor of, as it will be prominent.
- Pure Maple Syrup (2 tablespoons): This natural sweetener adds a subtle caramel note. You can substitute with agave nectar or date syrup if desired.
- Semisweet or Dark Chocolate Chips (10-ounce bag): For a dairy-free version, use certified vegan chocolate chips. We recommend a high-quality brand with a high cocoa content for the best flavor and health benefits.
- Coconut Oil (2 teaspoons): This helps thin the melted chocolate for perfect dipping consistency. It’s a healthy fat that solidifies when cold, giving the cups a great snap.
- Flaky Sea Salt (optional): A small sprinkle on top enhances all the flavors beautifully.
Step-by-Step Instructions for Perfect Cups
Follow these straightforward steps for flawless Peanut Butter Protein Cups every time. No special skills are required!
Step 1: Prepare the Peanut Butter Filling
To a small microwave-safe bowl, add the natural creamy peanut butter. Microwave it for 20-30 seconds until it has a runny, easily stirrable consistency. This step is crucial for blending the other ingredients smoothly.
Add the vanilla protein powder and pure maple syrup to the warm peanut butter. Stir very well until a thick, uniform dough forms. It should hold together when pressed.
Step 2: Portion the Filling
Using a 1-tablespoon cookie dough scoop or a regular spoon, portion the peanut butter mixture into 12 equal balls. Gently flatten each ball into a small disc, roughly 1 ½ inches in diameter, so it will fit nicely into the bottom of a muffin cup. Place these discs on a plate and set them aside for assembly.
Step 3: Melt the Chocolate Coating
In another small microwave-safe bowl, combine the chocolate chips and coconut oil. Microwave in 30-second increments, stirring thoroughly between each burst, until the chocolate is completely melted and smooth. Be careful not to overcook, as chocolate can burn easily. The coconut oil will give the chocolate a perfect dipping consistency and a lovely glossy finish.
Step 4: Assemble the Cups
You will need a 12-cup silicone muffin pan or a standard metal muffin pan lined with paper liners. Use a spoon to place a scant tablespoon of the melted chocolate into the bottom of each muffin cup. With the back of the spoon, spread the chocolate to create an even base layer. Next, place one peanut butter disc in the center of each chocolate-lined cup.
Finally, top each peanut butter disc with about one more tablespoon of melted chocolate. Gently swirl the spoon to ensure the peanut butter is completely covered. If using, sprinkle a tiny pinch of flaky sea salt on top of each cup.
Step 5: Set and Serve
Place the entire muffin pan in the freezer. Allow the cups to set completely for at least 15-20 minutes. The chocolate will become firm. Once set, gently pop the cups out of the silicone mold or remove them from the paper liners.
For busy families looking for more easy meal solutions, explore our collection of 14 easy crockpot meals.
Storage and Serving Suggestions
Store your homemade Peanut Butter Protein Cups in an airtight container. They keep best in the refrigerator for up to 5 days or in the freezer for up to 3 months. They are delicious straight from the fridge with a cool, firm texture.
This recipe is a fantastic make-ahead option for meal prep, ensuring you always have a healthy snack on hand. Pair one with a piece of fruit for a balanced mini-meal.
Nutritional Breakdown per Serving
Understanding what you’re eating is key to a balanced diet. Each of these 12 delicious cups provides a substantial nutritional punch. The combination of protein, healthy fats, and fiber makes them a satisfying choice that can help curb cravings. The following table details the nutrition for one peanut butter protein cup.
| Nutrient | Amount per Serving |
|---|---|
| Calories | 240 calories |
| Total Fat | 16 g |
| Carbohydrates | 18 g |
| Fiber | 3 g |
| Sugar | 12 g |
| Protein | 7 g |
| Sodium | 8 mg |
Ways to Customize Your Protein Cups
This recipe is a wonderful base for creativity. Feel free to experiment with different add-ins to suit your taste. Try mixing a teaspoon of cinnamon into the peanut butter filling for a warm spice note. You could also stir in some finely chopped dates or a tablespoon of cacao nibs for extra texture and antioxidants. For a different flavor profile, use a chocolate protein powder and top the cups with a drizzle of melted peanut butter instead of the second chocolate layer.
The possibilities are endless, much like the versatility found in our 16 delicious and easy taco potato recipes.
Final
These Peanut Butter Protein Cups prove that healthy eating doesn’t have to be bland or restrictive. With just a few minutes of effort, you can create a decadent-tasting snack that aligns with your wellness goals. They are perfect for athletes, busy professionals, parents, and anyone with a sweet tooth looking for a better option.
By combining the timeless duo of chocolate and peanut butter with the power of protein, this recipe delivers satisfaction in every bite. Whip up a batch this week and enjoy a delicious, guilt-free treat that fuels your body and delights your senses
Recipe
Print
Peanut Butter Cups
- Total Time: PT-493698H6S
- Yield: 12 servings 1x
Description
Decadent, no-bake chocolate cups with a creamy peanut butter and protein powder filling. A healthy, high-protein snack or dessert that’s easy to make and perfect for satisfying sweet cravings.
Ingredients
⅔ cup natural creamy peanut butter
⅓ cup vanilla protein powder (30 g), plant-based or whey protein powder
2 tablespoons pure maple syrup
1 (10 ounce) bag semisweet or dark chocolate chips, use vegan chocolate chips for dairy free
2 teaspoons coconut oil
Flaky sea salt, optional
Instructions
- To a small microwave-safe bowl, add the peanut butter. Microwave until the pb has a runny consistency, 20-30 seconds. Add the protein powder and maple syrup; stir well to combine.
- Using a 1-tablespoon cookie dough scoop, scoop the peanut butter mixture into 12 portions. Gently flatten each portion into a small disc that will fit into the bottom of the muffin pan cups (about 1 ½ inches diameter). Transfer the peanut butter discs a plate and set aside until Step 5.
- To a small microwave-safe bowl, add the chocolate chips and coconut oil. Microwave in 30-second increments, stirring between each one, until the chocolate is melted. (TIP: watch carefully so as not to overcook and burn the chocolate.)
- To the cups of a 12-cup silicone muffin pan (or a metal muffin pan with paper liners), use a spoon to place a scant one tablespoon of melted chocolate in each muffin well. With the back of the spoon, spread the chocolate out so that it evenly coats the bottoms of each cup or paper liner.
- Place one peanut butter disc in the center of each muffin well.
- Top the peanut butter disc in each cup with an additional 1 tablespoon of the melted chocolate. Swirl the chocolate gently with the back of the spoon to evenly cover the peanut butter.
- Sprinkle tops with flaky sea salt, if desired. Place the muffin pan in the freezer until chocolate is set, at least 15 minutes.
- Remove from the freezer and gently remove each peanut butter cup from the pan. Store in an airtight container in the fridge for up to 5 days or in the freezer for up to 3 months.
Notes
- For a nut-free version, use sunflower seed butter.
- Ensure protein powder is fully incorporated into the peanut butter mixture to avoid a gritty texture.
- A silicone muffin pan is highly recommended for easy removal.
- Prep Time: 15 min
- Cook Time: 0 min
- Category: Main Course
- Method: Baked
- Cuisine: American
Nutrition
- Serving Size: 1 cup
- Calories: 240 calories
- Sugar: 12 g
- Sodium: 8 mg
- Fat: 16 g
- Carbohydrates: 18 g
- Fiber: 3 g
- Protein: 7 g