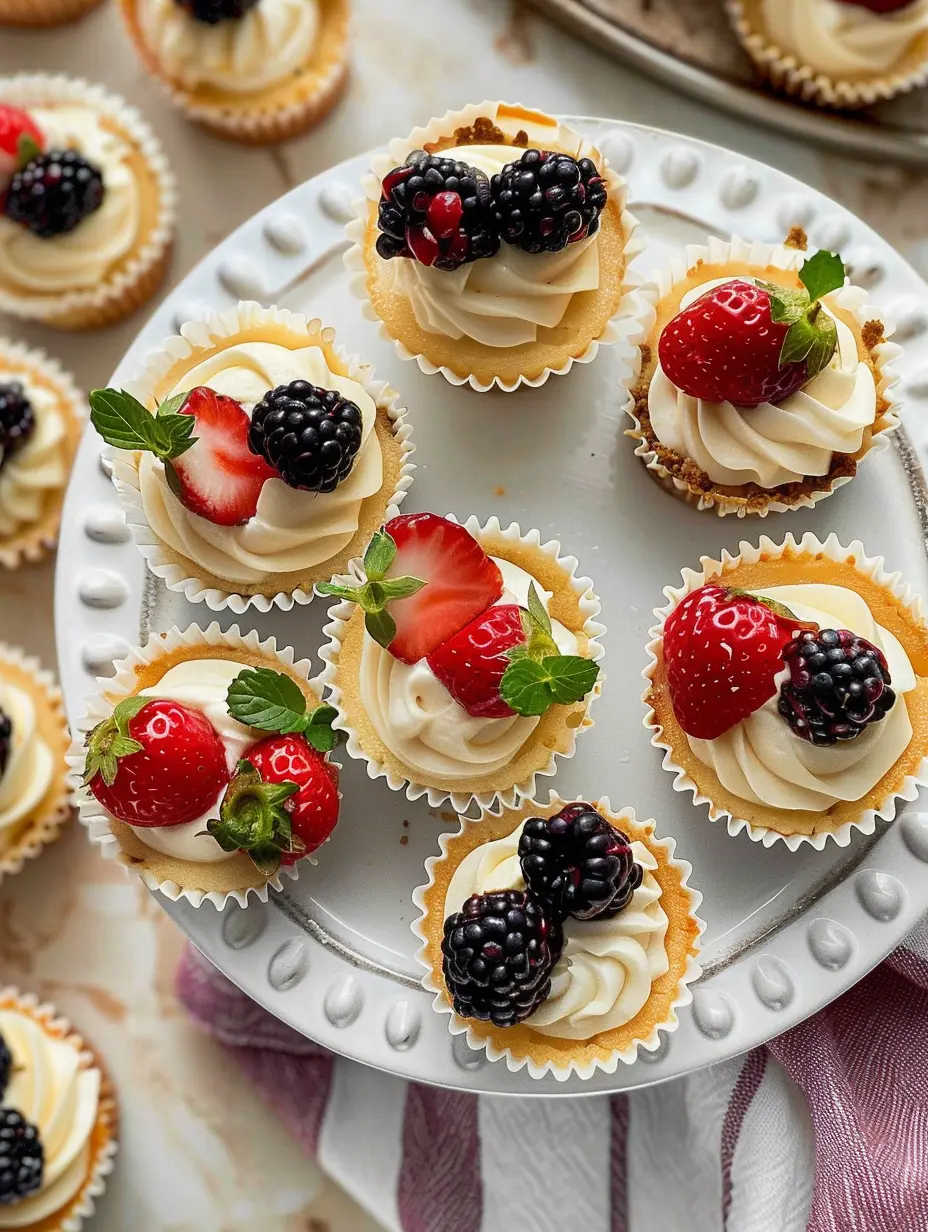
Imagine the classic, creamy indulgence of a New York-style cheesecake, perfectly portioned for one. That’s the magic of mini cheesecake cups. These individual cheesecake desserts have taken the culinary world by storm, offering a simple sweet treat that’s elegant enough for a dinner party and easy enough for a weeknight craving. This recipe delivers a velvety-smooth, rich filling nestled in a buttery graham cracker crust, all in a convenient, single-serving cup.
Whether you call them mini cheesecakes, cheesecake bites, or dessert cups, they are a guaranteed crowd-pleaser. Let’s dive into how you can master this easy no bake recipe and create these delightful creamy dessert cups at home.
Why Mini Cheesecake Cups Are a Must-Try Dessert
The popularity of mini cheesecake cups isn’t just a trend; it’s a reflection of their sheer practicality and deliciousness. Unlike a full-sized cheesecake that requires precise baking and lengthy chilling, these individual portions are more forgiving. They bake faster, chill quicker, and offer built-in portion control. They are the ultimate quick dessert idea for potlucks, baby showers, holiday gatherings, or just because.
The single-serving format also means endless customization. You can create a platter with different toppings, from fresh berries to chocolate ganache, satisfying every guest’s preference. Their charm lies in combining the sophistication of a classic dessert with the approachable nature of a cupcake.
Essential Ingredients for Creamy Perfection
The secret to a sublime mini cheesecake lies in the quality and temperature of your ingredients. For the crust, you’ll need graham cracker crumbs, a touch of sugar, and melted unsalted butter. The crumbs form a sandy, pressable base that firms up beautifully when baked. For the filling, full-fat brick cream cheese is non-negotiable. It provides the structure and rich tang that defines cheesecake. Always ensure it’s softened to room temperature for a lump-free, silky batter.
Granulated sugar sweetens the deal, while full-fat sour cream (also at room temperature) adds moisture and a subtle tang. Pure vanilla extract and a splash of freshly squeezed lemon juice brighten the flavor profile. Finally, large eggs, brought to room temperature, bind the filling and give it a delicate, set texture. Remember, room temperature ingredients are the key to preventing a lumpy batter and ensuring your creamy dessert cups have a perfectly smooth consistency.
Step-by-Step Guide to Baking Mini Cheesecakes
Creating these treats is a straightforward process, but a few pro tips will elevate your results. Begin by preheating your oven to 350°F (177°C) and lining a standard 12-cup muffin pan with paper or foil liners.
1. Crafting the Perfect Crust
In a medium bowl, combine the graham cracker crumbs and granulated sugar. Pour in the melted unsalted butter and mix until the mixture resembles wet sand. Using a tablespoon or the bottom of a small glass, firmly press a heaping tablespoon of this mixture into the bottom of each prepared liner.
A firm press is crucial to prevent a crumbly crust. Par-bake the crusts for 6 minutes. This step helps set the crust so it doesn’t become soggy when the wet filling is added.
2. Preparing the Luxurious Filling
Using a handheld or stand mixer fitted with a paddle attachment, beat the softened cream cheese and granulated sugar on medium-high speed for about 2 minutes. Stop and scrape down the sides of the bowl to ensure everything is incorporated. The mixture should be completely smooth and creamy. Add the room-temperature sour cream, pure vanilla extract, and freshly squeezed lemon juice.
Beat until just combined. With the mixer on low or medium speed, add the room-temperature eggs one at a time, beating just until the yolk disappears after each addition. Over-beating the eggs incorporates too much air, which can lead to cracking. The batter should be thick, smooth, and glossy.
3. The Secret Steam Bath (Optional but Recommended)
To prevent excessive sinking and surface cracks—common issues with cheesecakes—consider using a steam bath. This is a simplified version of a traditional water bath. Place a large metal roasting pan (avoid glass) on the bottom rack of your preheated oven. Carefully pour about 1 inch of boiling water into the pan.
Immediately place the filled muffin pan on the center rack above it and close the oven door. The steam created from the water bath provides gentle, even heat, helping the cheesecakes bake slowly and evenly. It’s a game-changer for achieving a professional, smooth surface on your mini cheesecake cups.
4. Baking and Cooling for Ideal Texture
Bake the cheesecakes for about 18-22 minutes. They are done when the edges look set but the centers still have a slight jiggle when you gently tap the pan. The residual heat will continue to cook them as they cool. Place the pan on a wire rack and let the cheesecakes cool at room temperature for at least 45 minutes. This gradual cooling is another critical step to prevent cracking. Then, transfer them to the refrigerator to chill for a minimum of 2 hours, or ideally overnight.
This chilling time allows the flavors to meld and the texture to firm up into that classic, creamy cheesecake consistency. For a similar chilled dessert experience, check out our recipe for Strawberry Cheesecake Brownies, which combines fudgy brownie layers with a creamy cheesecake swirl.
Creative Toppings and Serving Suggestions
The fun part of making individual cheesecake desserts is the decoration. Once fully chilled, unleash your creativity. A simple dollop of freshly whipped cream piped with a star tip (like a Wilton 1M) adds classic elegance. Fresh berries—strawberries, blueberries, raspberries, or a mix—provide a vibrant, tangy contrast. For chocolate lovers, a drizzle of warm chocolate ganache or a sprinkle of chocolate shavings is irresistible.
A spoonful of tart cherry pie filling or a caramel sauce swirl are also fantastic options. Garnish with a mint leaf for a pop of color. Remember, you can prepare and pipe whipped cream up to a day in advance. Store decorated cheesecakes in the refrigerator until ready to serve. Leftovers (if you have any!) keep beautifully, covered, in the fridge for up to 5 days.
Expert Tips for Foolproof Cheesecake Cups
Room Temperature is Key
We cannot stress this enough: all refrigerated ingredients (cream cheese, sour cream, eggs) must be brought to room temperature before mixing. Cold cream cheese will never become smooth, leading to a lumpy batter. Cold ingredients also don’t emulsify as well, which can cause the batter to separate or the cheesecakes to crack.
Avoid Over-Mixing
Once you add the eggs, mix only until they are just incorporated. Over-mixing incorporates excess air, which expands in the oven and then collapses as the cheesecakes cool, causing cracks and a less dense texture.
Don’t Skip the Chill
Patience is a virtue with cheesecake. The long chilling time in the refrigerator is not optional; it’s what transforms the baked custard into the firm, sliceable, creamy dessert we all love.
If you’re in a hurry, you can place them in the freezer for about 1 hour to speed up the initial set, but a longer fridge chill is best for flavor.
Experiment with Crusts
While graham cracker is classic, feel free to experiment. Crushed digestive biscuits, vanilla wafers, or even chocolate sandwich cookies (like Oreos, with the filling) make excellent crusts. Just maintain the same ratio of crumbs to butter and sugar. For another decadent baked dessert that’s perfect for sharing, explore our Chocolate Lava Cake recipe, featuring a gooey, molten center.
Nutritional Information for Mini Cheesecake Cups
While these are undoubtedly a treat, it’s helpful to know what you’re enjoying. The following table provides an approximate nutritional breakdown per mini cheesecake cup, without toppings. Values may vary based on specific brands and measurements used.
| Nutrient | Amount per Serving |
|---|---|
| Calories | Approx. 280 kcal |
| Total Fat | 20g |
| Saturated Fat | 11g |
| Unsaturated Fat | 7g |
| Trans Fat | 0g |
| Cholesterol | 85mg |
| Sodium | 220mg |
| Total Carbohydrates | 22g |
| Dietary Fiber | 0.5g |
| Sugars | 16g |
| Protein | 5g |
Conclusion: Your New Go-To Dessert
Mini cheesecake cups are the ultimate versatile dessert. They encapsulate the luxurious experience of cheesecake in a perfectly portable, customizable package. This easy no bake recipe, with its detailed guidance on the steam bath and ingredient temperatures, empowers bakers of all levels to achieve professional results at home. The process is simple, the ingredients are familiar, and the payoff is immense—creamy, dreamy individual cheesecake desserts that will earn you rave reviews.
So, preheat your oven, line your muffin pan, and get ready to bake a batch of these irresistible simple sweet treats. And if you’re looking for more protein-packed breakfast or dessert ideas using cheese, don’t miss our delicious and easy Cottage Cheese Pancakes.
Recipe
Print
Mini Cheesecake Cups
- Total Time: 3 hr 15 min
- Yield: 12 servings 1x
Description
Creamy, individual New York-style cheesecakes with a buttery graham cracker crust, baked to perfection in a muffin pan. The ultimate easy and elegant dessert for any occasion.
Ingredients
1 cup (120g) graham cracker crumbs (about 8 full sheet graham crackers)
2 Tablespoons (25g) granulated sugar
3 Tablespoons (43g) unsalted butter, melted
16 ounces (452g) full-fat brick cream cheese, softened to room temperature
1/2 cup (100g) granulated sugar
1/4 cup (60g) full-fat sour cream, at room temperature
1 teaspoon pure vanilla extract
1 teaspoon freshly squeezed lemon juice
2 large eggs, at room temperature
Instructions
- Preheat oven to 350°F (177°C). Line a standard 12-count muffin pan with cupcake liners.
- Make crust: Combine graham cracker crumbs, sugar, and melted butter. Press 1 heaping Tbsp firmly into each liner. Bake for 6 minutes.
- Make filling: Beat softened cream cheese and sugar until smooth and creamy (~2 mins). Add sour cream, vanilla, and lemon juice; beat to combine.
- With mixer on medium, add eggs one at a time, beating just until combined after each. Do not over-mix.
- Divide batter evenly among liners, filling to the top.
- Optional Steam Bath: Place a metal pan on bottom oven rack. Pour 1 inch of boiling water into it. Immediately place muffin pan on center rack above. Close oven.
- Bake for 18-22 minutes, until edges are set and centers slightly jiggle.
- Cool in pan on rack for 45 mins, then refrigerate for at least 2 hours (or up to 24 hours) before serving. Garnish as desired.
Notes
- Ensure ALL cold ingredients (cream cheese, sour cream, eggs) are at room temperature for a smooth, lump-free filling.
- The optional steam bath (placing a pan of water below the cheesecakes) helps prevent cracks and sinking.
- Do not over-beat the batter after adding the eggs, as this incorporates too much air and can cause cracks.
- Chilling is mandatory for the proper creamy, set texture. For best flavor, chill overnight.
- Store covered in the refrigerator for up to 5 days.
- Prep Time: 20 min
- Cook Time: 22 min
- Category: Main Course
- Method: Baked
- Cuisine: American
Nutrition
- Serving Size: 1 cheesecake cup
- Calories: 280
- Sugar: 16
- Sodium: 220
- Fat: 20
- Saturated Fat: 11
- Unsaturated Fat: 7
- Trans Fat: 0
- Carbohydrates: 22
- Fiber: 0.5
- Protein: 5
- Cholesterol: 85