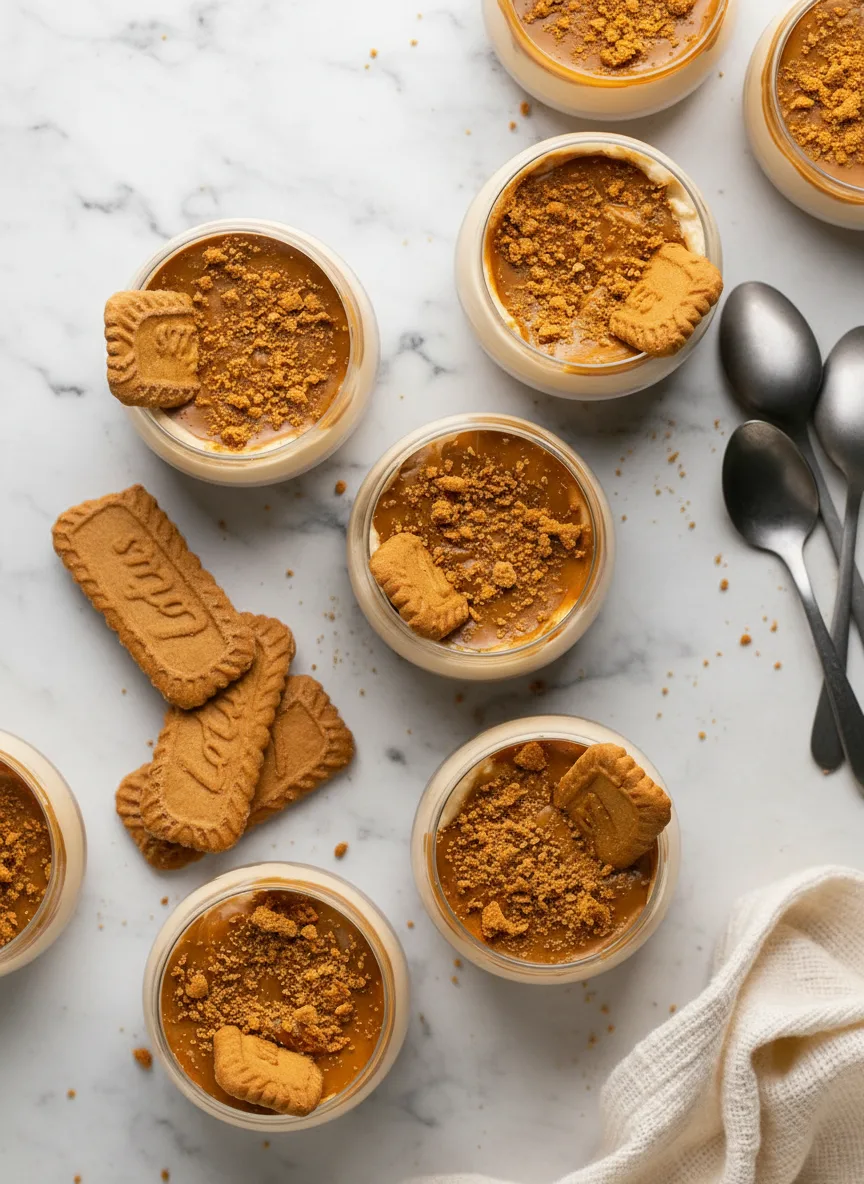
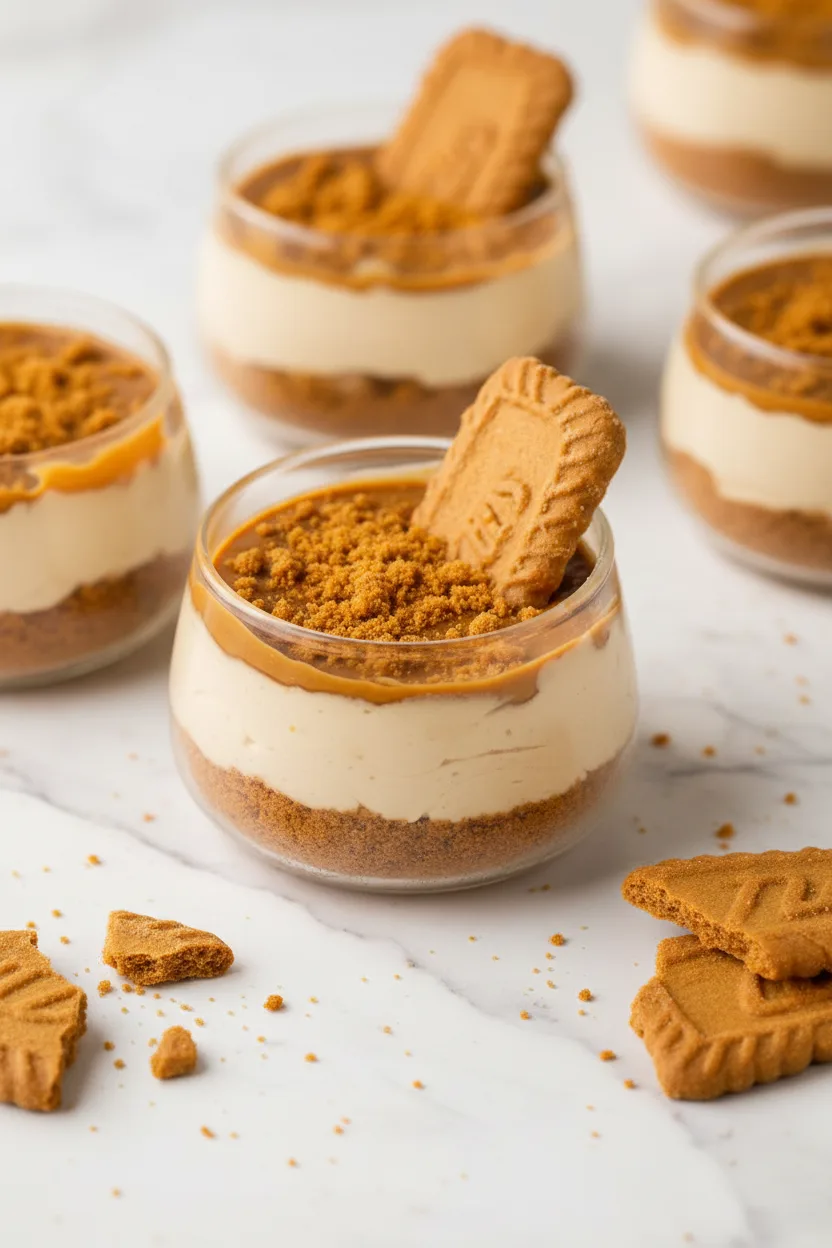
Get ready to spoil your taste buds with these heavenly no-bake Biscoff cheesecake cups! These individual desserts combine crunchy cookie crusts with creamy filling and luscious caramelized biscuit toppings. Perfect for parties, potlucks, or treating yourself after a long day.
Our simplified method skips oven time while delivering restaurant-worthy results. You need just seven ingredients to create these showstopping cups your guests will beg you to make again. Let’s dive into why these treats belong in every dessert lover’s recipe box!
Why You Love These Biscoff Cheesecake Cups
These dessert cups check every box: easy preparation, stunning presentation, and unforgettable flavors. Within moments, you’ll understand why people call these “little bites of happiness.”
Effortless Entertaining
Whip up these cups hours before guests arrive since refrigeration does all the work. Avoid last-minute dessert stress while impressing visitors with your culinary skills.
Crowd-Pleasing Flavors
The warm spice notes from Biscoff cookies pair perfectly with rich cream cheese filling. Sweet without being cloying, these satisfy all palates.
Creative Customization
Turn basic cheesecake cups into personalized creations with different toppings and cookie combinations. Later, we’ll explore exciting flavor variations.
Recipe
Print
No-Bake Biscoff Cheesecake Cups
- Total Time: 4 hr 20 min
- Yield: 8 servings 1x
Description
Creamy no-bake cheesecake cups with crunchy Biscoff crust and caramelized cookie topping. Perfect individual desserts for parties or special treats.
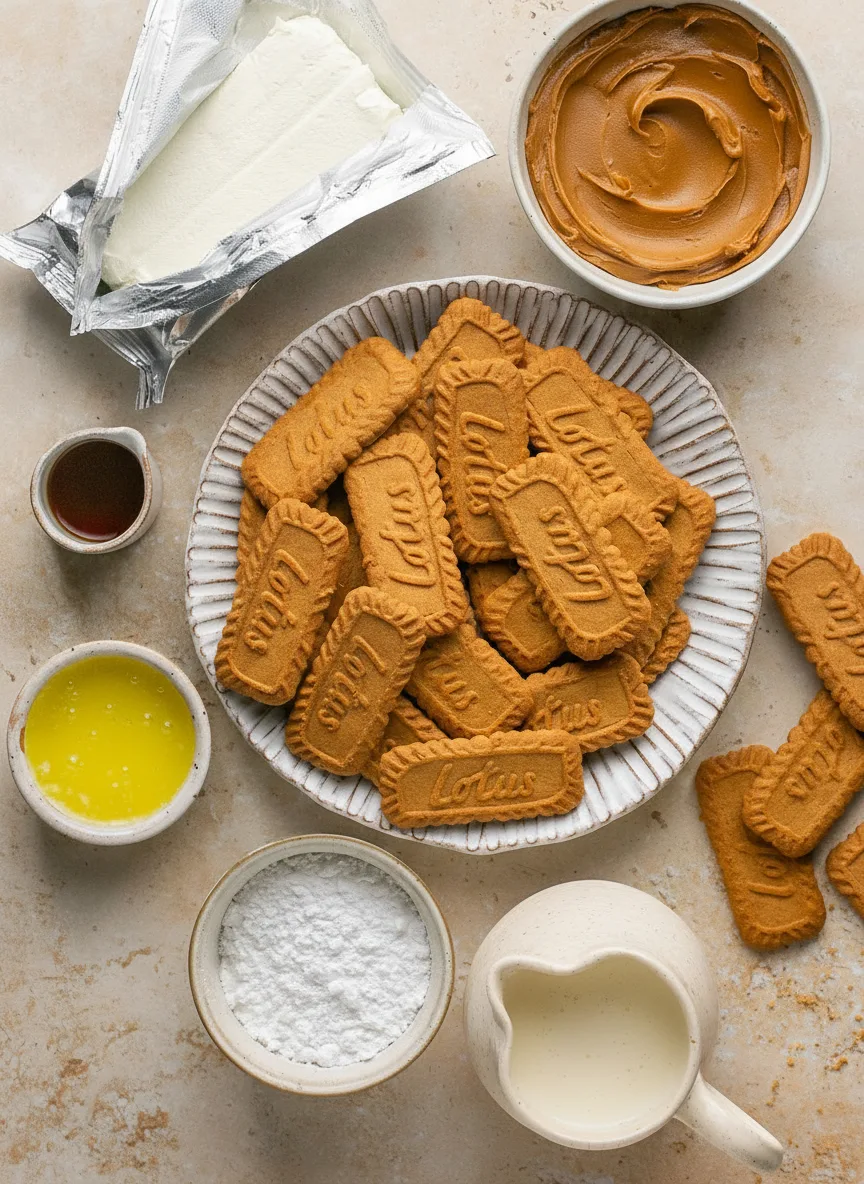
Ingredients
- 30 Biscoff biscuits (270 g)
- 2 tablespoons unsalted butter, melted (30 ml)
- 16 oz heavy cream (480 ml)
- 8 oz cream cheese, at room temperature (225 g)
- 1/2 cup powdered sugar (60 g)
- 1/2 cup Biscoff spread (130 g)
- 1 teaspoon vanilla extract (5 ml)
- 1/2 cup Biscoff spread for topping (130 g)
- 8 Biscoff cookies, cut in half
Instructions
- Crush biscuits into fine crumbs using food processor or rolling pin.
- Combine crumbs with melted butter in medium bowl. Reserve few tablespoons for decoration.
- Press 2-3 tablespoons crumb mixture into each serving cup. Set aside.
- Whip heavy cream in large bowl until stiff peaks form.
- In separate bowl, whisk cream cheese, powdered sugar, 1/2 cup Biscoff spread, and vanilla until smooth.
- Gradually fold whipped cream into cream cheese mixture until fully incorporated.
- Transfer cheesecake mixture to piping bag and pipe into prepared cups.
- Melt remaining 1/2 cup Biscoff spread in microwave for 20 seconds until liquid.
- Drizzle melted spread over cheesecake cups.
- Top with cookie halves and sprinkle reserved crumbs.
- Refrigerate at least 4 hours until firm before serving.
Notes
- Use room temperature cream cheese for smoothest filling texture.
- Press crust firmly but not excessively to maintain pleasant texture.
- Decorate just before serving for best presentation.
- Experiment with different cookie types for creative variations.
- Prep Time: 20 min
- Category: Main Course
- Method: Baked
- Cuisine: American
Nutrition
- Calories: 634 kcal
- Sugar: 25 g
- Sodium: 251 mg
- Fat: 47 g
- Carbohydrates: 47 g
- Fiber: 1 g
- Protein: 7 g
Ingredients and Substitutions
Gather these simple components for your dessert masterpiece. Let’s examine potential swaps for dietary needs or pantry limitations.
Base Components
- 30 Biscoff biscuits (270g) – Substitute graham crackers or ginger snaps
- 2 tablespoons unsalted butter (30g), melted – Use coconut oil for dairy-free
Creamy Filling
- 16 oz heavy cream (480ml)
- 8 oz cream cheese (225g), softened – Dairy-free cream cheese works perfectly
- 1/2 cup powdered sugar (60g) – Swap with equal amounts coconut sugar
- 1/2 cup Biscoff spread (130g), plus 1/2 cup extra for topping
- 1 teaspoon vanilla extract
Finishing Touches
- 8 Biscoff cookies, halved
- Reserved crumbs from base mixture
Before making your shopping list, check out our satisfying skirt steak rice bowls for a savory main course pairing these sweet treats nicely.
How to Make No-Bake Cheesecake Cups
Follow these straightforward steps for flawless dessert cups requiring no oven time!
Step 1: Create the Crust
Pulverize all biscoff biscuits into fine crumbs using a food processor or rolling pin. Combine crumbs thoroughly with melted butter in a medium bowl until mixture resembles wet sand.
Step 2: Assemble Bases
Press 2-3 tablespoons of crumb mixture into each serving cup, reserving 3 tablespoons for decoration. Use a flat-bottomed glass or measuring cup to compact crumbs firmly.
Step 3: Whip Cream
Beat heavy cream in a large bowl using an electric mixer until stiff peaks form. This creates the airy base for your filling.
Step 4: Prepare Filling
In a separate bowl, blend softened cream cheese, powdered sugar, 1/2 cup Biscoff spread, and vanilla until smooth and lump-free. Gently fold whipped cream into mixture until fully incorporated.
Step 5: Pipe and Decorate
Transfer filling to a piping bag and divide among prepared cups. Microwave remaining 1/2 cup Biscoff spread 20 seconds until pourable. Drizzle over cheesecake layers and garnish with halved cookies and reserved crumbs.
Step 6: Chill and Serve
Refrigerate cups minimum 4 hours before serving. Chilling allows flavors to develop while firming the texture perfectly.
Pro Tips for Success
Elevate your dessert game with these professional kitchen secrets for flawless results every time:
Temperature Matters
Use room-temperature cream cheese to prevent lumpy filling. Cold cream cheese creates uneven texture despite thorough mixing.
Crumb Control
When preparing crusts, compress crumbs firmly enough to hold shape but not so tightly they become unpleasantly dense.
Peak Perfection
Stop whipping cream when peaks hold their shape when beaters are lifted. Over-whipping leads to grainy, butter-like texture.
Decoration Details
Apply toppings just before serving for maximum visual impact. Melty spread decorations can soften over time in the refrigerator.
Flavor Variations
Customize your cheesecake experience with these exciting ingredient twists. Make them your signature dessert creations!
Chocolate Drizzle Delight
Substitute chocolate sauce for Biscoff spread topping. Combine with crushed chocolate cookies for crust instead of classic biscuits.
Fruit Fusion
Layer fresh raspberries or sliced strawberries between filling and topping. Try mango puree swirls for tropical flair.
Boozy Upgrade
For adult gatherings, incorporate one to two tablespoons coffee-flavored syrup into the filling mixture.
Pair these creative cups with our healthy avocado chicken salad for balanced lunch-and-dessert combos.
Serving Suggestions
While these cups shine solo, consider these presentation ideas for different occasions:
Elegant Events
Serve cups on vintage cake stands with edible gold leaf accents alongside champagne flutes for sophisticated gatherings.
Casual Treats
Package individual cups in mason jars with colorful ribbons for picnics or outdoor parties.
Complementary Pairings
Balance rich cheesecakes with tart berry compotes or citrus sorbets. Dark coffee cuts through sweetness beautifully.
For savory meal combinations, try our grilled chicken Cobb salad before indulging in dessert.
Storage and Freezing Instructions
Keep your cheesecake cups fresh with these preservation guidelines:
Refrigeration
Store assembled cups in airtight containers 5-7 days. The flavors intensify slightly over time.
Freezing Cheesecakes
Freeze undecorated cups up to 2 months. Thaw overnight in refrigerator before adding toppings. Avoid freezing decorated cups.
Component Storage
Prepare crusts and fillings separately 2 days ahead. Assemble 4 hours before serving for optimal freshness.
Nutrition Facts per Serving
| Calories | Fat | Carbs | Protein | Fiber | Sugar | Sodium |
|---|---|---|---|---|---|---|
| 634 kcal | 47 g | 47 g | 7 g | 1 g | 25 g | 251 mg |
Nutritional values represent one standard serving. Values may vary based on ingredient substitutions or additions.
FAQs About Biscoff Cheesecake Cups
Can I make these gluten-free?
Absolutely! Substitute gluten-free cookies in both crust and decoration. Ensure all other ingredients meet gluten-free certifications.
Why did my cheesecake filling separate?
Separation occurs when ingredients differ in temperature too much. Ensure all components reach room temperature before mixing unless specified otherwise.
How small can I make these cups?
Create bite-sized versions using mini shot glasses or silicone molds. Reduce crust amounts to 1 tablespoon and adjust filling accordingly.
Can I use homemade Biscoff spread?
Definitely! Substitute homemade spread in equal amounts. Allow it to cool slightly before drizzling for proper viscosity.
Final Thoughts
These no-bake Biscoff cheesecake cups prove that impressive desserts need not require complicated techniques or hours of oven-watching. With their harmonious textures and irresistible flavors, these handheld treats will become your secret entertaining weapon. Whether hosting holiday parties or enjoying quiet nights in, they deliver pure joy in every spoonful.
Imagine watching friends’ delighted faces as they crack through that caramelized topping into creamy perfection below. Picture yourself relaxing with a cup knowing you spent minimal effort creating this culinary masterpiece. That’s the magic of this recipe – simple processes yielding extraordinary results.
Gather your ingredients and discover why these cups deserve permanent spots in your recipe rotation. Your dessert game will never be the same!