Imagine a perfect bowl of pasta salad, full of color, fresh flavor, and satisfying texture. This Grilled Vegetable Pesto Pasta Salad brings that vision to life. It combines tender pasta with bright, crisp vegetables and a vibrant, herby homemade pesto sauce.
Best of all, it comes together in about twenty minutes. Consequently, it is perfect for a quick lunch, a fantastic side dish, or a make-ahead meal for the whole week. Packed with wholesome ingredients, this salad feels both nourishing and indulgent. It is a guaranteed crowd-pleaser for potlucks and family dinners alike.

Why You’ll Love This Grilled Vegetable Pesto Pasta Salad
First, this recipe delivers incredible flavor with minimal effort. The homemade pesto is quick to make and tastes far better than store-bought versions. It coats every piece of pasta and vegetable in a glossy, fragrant layer of goodness.
Secondly, the combination of textures is absolutely delightful. You get the chew of the pasta, the crunch of fresh vegetables, the pop of peas, and the buttery crunch of toasted pine nuts. Ultimately, every bite is interesting and satisfying.
Additionally, this salad is incredibly versatile. You can easily swap vegetables based on the season or what you have in your fridge. It is also a fantastic dish for meal prep. You can make a big batch on Sunday and enjoy it for several days as the flavors meld and improve.
For a wonderful sweet treat after this savory meal, consider our delightful lemon cupcakes with blueberry buttercream for dessert. They offer a bright and fruity finish that pairs beautifully.
Recipe
Print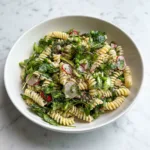
Grilled Vegetable Pesto Pasta Salad
- Total Time: 20 min
- Yield: 6 servings 1x
Description
A vibrant and quick pasta salad with fresh vegetables, a simple homemade pesto, and toasted pine nuts. Perfect for meals all week.
Ingredients
- 1.1 lb dried pasta of choice (500 g)
- 6.3 oz asparagus, ends trimmed, thinly sliced (180 g)
- 5.3 oz radishes, thinly sliced (150 g)
- 5.3 oz frozen peas, thawed (150 g)
- 2.1 oz toasted pine nuts (60 g)
- 2.1 oz hard cheese, shaved or grated (60 g)
- 2.1 oz fresh basil, roughly chopped (60 g)
- 2 garlic cloves, minced
- 1/2 cup extra-virgin olive oil (120 ml)
- 3.5 oz rocket/arugula (100 g)
- 1 lemon, juice only
Instructions
- Bring generously salted water to a boil in a large saucepan. Cook your pasta according to the package instructions, then rinse under cold water, drain and transfer to a large salad bowl.
- Add the asparagus, radishes, peas, toasted pine nuts, cheese, fresh basil, garlic and extra-virgin olive oil. Season generously with salt and pepper and toss well to combine.
- Add the rocket and lemon juice and toss again to combine, then serve and enjoy or pack in airtight containers and enjoy throughout the week.
Notes
- You can thaw frozen peas by covering them with boiling water and letting them sit for 5-10 minutes before draining.
- For best results, let the salad sit for 15-20 minutes after mixing to allow the flavors to meld before serving.
- Prep Time: 5 min
- Category: Main Course
- Method: Baked
- Cuisine: American
Ingredients and Substitutions
This recipe uses simple, fresh ingredients that work together in perfect harmony. Here is what you will need to make this delicious pasta salad.
Base Components
- Pasta: Use 500 grams of your favorite short dried pasta. Shapes like fusilli, penne, or farfalle work best as they hold the sauce well.
- Asparagus: About 180 grams, ends trimmed and thinly sliced. It adds a wonderful grassy flavor and crisp-tender texture.
- Radishes: 150 grams, thinly sliced. They provide a beautiful pop of color and a peppery crunch.
- Peas: 150 grams of frozen peas, thawed. They add sweetness and a lovely green hue.
- Pine Nuts: 60 grams, toasted. They give a rich, nutty flavor and essential crunch.
- Cheese: 60 grams of a hard, savory cheese, shaved or grated. It adds a salty, umami depth to the dish.
- Rocket (Arugula): 100 grams. Its peppery bite is the perfect fresh finish.
Sauce and Seasonings
- Fresh Basil: 60 grams, roughly chopped. This is the star of our simple pesto.
- Garlic: 2 cloves, minced. It provides a sharp, aromatic base note.
- Extra-Virgin Olive Oil: 120 milliliters. Use a good quality oil for the best flavor.
- Lemon: Juice of one whole lemon. The fresh acidity brightens all the other flavors.
- Salt and Pepper: To season generously.
Smart Substitutions
Do not worry if you are missing an ingredient. This salad is very forgiving. For the pasta, any small shape will do. You can swap asparagus for broccoli florets or green beans. Furthermore, if radishes are not your thing, try thinly sliced red bell pepper for crunch. Almonds or walnuts make a great substitute for pine nuts. Importantly, for a different herbal note, you can replace half the basil with fresh parsley or spinach. If you need a dairy-free option, simply omit the cheese or use a plant-based alternative.
How to Make Grilled Vegetable Pesto Pasta Salad
Follow these straightforward steps for a perfect pasta salad every single time. The process is simple, but a few key techniques make all the difference.
Step 1: Cook and Cool the Pasta
First, bring a large saucepan of generously salted water to a rolling boil. Add your chosen pasta and cook it according to the package directions for al dente. Once cooked, drain the pasta and rinse it immediately under cold running water. This stops the cooking process and cools the pasta quickly. Finally, transfer the cooled pasta to a large salad bowl where you will mix everything.
Step 2: Prepare the Vegetables and Pesto
While the pasta cooks, prepare your vegetables. Trim the tough ends from the asparagus and slice the stalks thinly. Next, wash the radishes and slice them thinly as well. Place the frozen peas in a heatproof bowl and cover them with boiling water. Let them sit for 5 to 10 minutes until thawed and bright green, then drain them well. Toast the pine nuts in a dry skillet over medium heat for a few minutes until fragrant and golden. Be sure to watch them closely as they can burn quickly.
Step 3: Combine and Toss
Now, add all the prepared components to the large bowl with the cooled pasta. This includes the sliced asparagus, radishes, thawed peas, toasted pine nuts, grated cheese, chopped fresh basil, and minced garlic. Pour in the extra-virgin olive oil. Generously season everything with salt and black pepper. Using large spoons or clean hands, toss everything together very well. You want every ingredient to get coated in the oil and begin to mingle.
Step 4: Finish and Serve
For the final touch, add the fresh rocket (arugula) and the juice of one lemon to the bowl. Toss gently once more to combine. The lemon juice will slightly wilt the arugula and pull all the flavors together. Taste and adjust the seasoning, adding more salt, pepper, or lemon juice as needed. You can serve it immediately, or for even better flavor, let it sit for 15-20 minutes before serving. It is also fantastic when packed in airtight containers for easy lunches throughout the week.
Pro Tips for Success
To elevate your pasta salad from good to great, keep these expert tips in mind. First, always salt your pasta water well. It should taste like the sea. This is your main chance to season the pasta itself. Secondly, do not skip rinsing the pasta after cooking. This prevents it from becoming gummy and stops the cooking so your vegetables stay crisp. Another key tip is to toast your nuts. Toasting pine nuts unlocks their full, rich flavor and makes them wonderfully crunchy. Be patient and toss them frequently in a dry pan.
Furthermore, add the arugula and lemon juice last. This keeps the arugula from getting too soggy and ensures the lemon’s bright acidity is front and center. Finally, let the salad rest. Allowing it to sit for a short while before serving lets the flavors marry and develop. The pasta soaks up the dressing, and everything becomes more cohesive. For a dessert with a similar zesty profile, our key lime cupcakes are a tangy and refreshing choice.
Flavor Variations
This recipe is a wonderful canvas for creativity. Feel free to mix and match ingredients based on your preferences or what is in season. For a richer salad, add some crumbled feta cheese or sliced black olives. If you want more protein, stir in some canned chickpeas, white beans, or shredded rotisserie chicken. For a different herb profile, try using a mix of basil, mint, and parsley. You could also add sun-dried tomatoes or artichoke hearts for a Mediterranean twist.
In the fall, try roasted butternut squash cubes and walnuts. In the summer, add fresh corn kernels and cherry tomatoes. The possibilities are nearly endless. The core formula of pasta, fresh vegetables, a simple sauce, and a crunchy element is very flexible. Simply keep the ratios similar, and you cannot go wrong.
Serving Suggestions
This pasta salad is a complete meal on its own, but it also pairs beautifully with other dishes. Serve it as the star of a picnic or barbecue spread alongside grilled veggie burgers or corn on the cob. It makes an excellent side dish for a simple piece of grilled fish or baked chicken. For a light lunch, portion it into containers with a piece of crusty bread.
You can also present it on a large platter garnished with extra basil leaves, lemon wedges, and a few extra shavings of cheese. It is visually stunning and tastes even better. If you are planning a full menu, a light and floral dessert like our lavender honey cupcakes would create a beautiful balance of flavors.
Storage and Freezing Instructions
Storing this salad is simple. Place any leftovers in an airtight container and refrigerate for up to 4 days. The flavors will continue to develop, making it taste even better the next day. You may notice the arugula wilts a bit, but the salad will still be delicious. If it seems dry after refrigeration, you can revive it with a small drizzle of fresh olive oil and a squeeze of lemon juice before serving.
Freezing is not recommended for this particular recipe. The fresh vegetables and fresh herbs do not hold their texture well after being frozen and thawed. The pasta can also become mushy. Therefore, it is best enjoyed fresh or stored in the refrigerator for a few days.
Nutrition Facts per Serving
| Calories | Fat | Carbs | Protein | Fiber | Sugar | Sodium |
|---|---|---|---|---|---|---|
| Approx. 480 | 24g | 55g | 14g | 6g | 5g | 320mg |
Please note that these values are estimates and can vary based on specific ingredients and portion sizes.
FAQs About Grilled Vegetable Pesto Pasta Salad
Can I make this pasta salad ahead of time?
Absolutely. In fact, making it a few hours ahead is a great idea. The flavors have time to blend together beautifully. Just hold off on adding the arugula and final lemon juice until just before you are ready to serve to keep everything fresh and crisp.
What is the best pasta shape to use?
Short shapes with nooks and crannies work best because they hold the sauce and small vegetable pieces. Excellent choices include fusilli, rotini, penne, farfalle (bow-tie), or orecchiette. Long pasta like spaghetti is not ideal for a chunky salad like this one.
How can I make this recipe vegan?
Making it vegan is easy. Simply omit the cheese or use a plant-based hard cheese alternative. Ensure all other ingredients, like your pasta, are vegan-friendly. The pesto gets plenty of flavor from the basil, garlic, nuts, and olive oil.
My pesto seems too thick. What should I do?
This recipe uses a “deconstructed” pesto method by mixing the components directly with the pasta. If it seems too dry after tossing, you can thin it out with a tablespoon or two of the pasta cooking water, a bit more olive oil, or an extra squeeze of lemon juice until it reaches your desired consistency.
Can I use a different green instead of arugula?
Of course. Baby spinach, chopped kale, or even fresh watercress would be lovely substitutes. Just remember that more delicate greens like spinach will wilt faster, so add them at the very last minute.
Final Thoughts
This Grilled Vegetable Pesto Pasta Salad is more than just a recipe, it is a reliable template for a delicious, healthy, and quick meal. It proves that eating well does not have to be complicated or time-consuming.
With its vibrant colors, fresh flavors, and satisfying textures, it is a dish that will please everyone at your table. So next time you need a foolproof dish for a gathering or a simple plan for weekday lunches, give this recipe a try. You will love how easily it comes together and how wonderfully it tastes. Happy cooking.