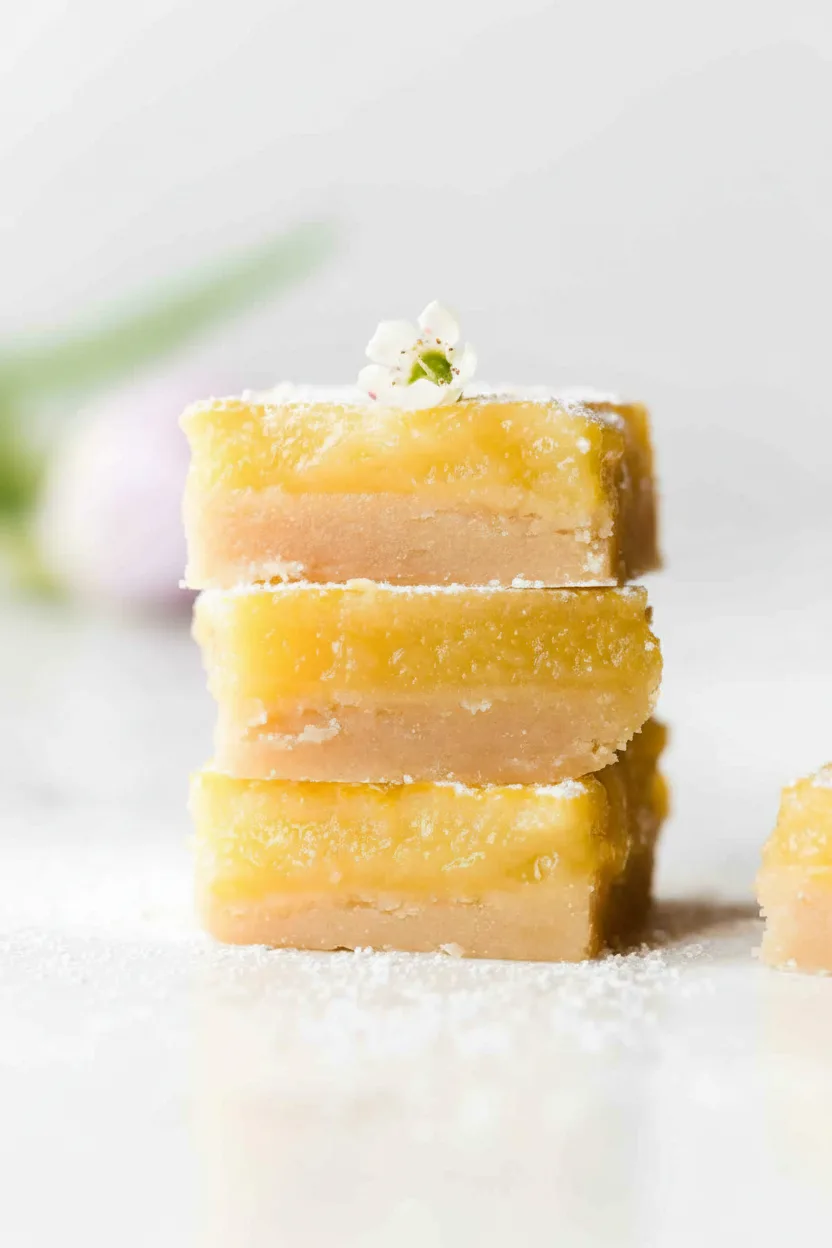
Discover the perfect balance of tangy and sweet with these classic lemon bars. These handheld treats feature a buttery shortbread crust topped with a bright citrus filling that dances across your taste buds. Whether you’re hosting a summer gathering or craving a zesty dessert, these lemon bars deliver refreshing flavor in every bite.
Why You’ll Love This Lemon Bars
Lemon bars offer three irresistible qualities that keep people coming back for seconds. First, their sunny flavor brightens any occasion from picnics to potlucks. Second, the contrast between crumbly crust and smooth filling creates delightful texture variations. Third, they look beautiful whether served at fancy parties or casual family dinners.
Many bakers appreciate how these treats travel well without losing their texture. What’s more, the lemon juice can be adjusted to suit your preferred tartness level. Some might pair them with crispy bread bowls for a savory-sweet meal combination.
Recipe
Print
Classic Lemon Bars
- Total Time: 3 hr 50 min
- Yield: 24 servings 1x
Description
Buttery shortbread crust topped with tangy lemon custard creates the perfect balance of sweet and tart flavors.
Ingredients
- 1 cup (16 Tbsp; 226g) unsalted butter, melted
- 1/2 cup (100g) granulated sugar
- 2 teaspoons pure vanilla flavoring
- 1/2 teaspoon salt
- 2 cups + 2 Tablespoons (265g) all-purpose flour (spooned & leveled)
- 2 cups (400g) granulated sugar
- 6 Tablespoons (46g) all-purpose flour
- 6 large eggs
- 1 cup (240ml) lemon juice (about 4 lemons)
- optional: confectioners sugar for dusting
Instructions
- Preheat the oven to 325°F (163°C). Line the bottom and sides of a 9×13-inch glass baking pan with parchment paper, leaving an overhang on the sides to lift the finished bars out. Set aside.
- Mix the melted butter, sugar, vanilla flavoring, and salt together in a medium bowl. Add the flour and stir to completely combine. Press firmly into prepared pan. Bake for 20-22 minutes or until edges are lightly browned.
- Using a fork, poke holes all over the top of the warm crust (not all the way through). Set aside until step 4.
- Sift the sugar and flour together in a large bowl. Whisk in the eggs, then the lemon juice until completely combined.
- Pour filling over warm crust. Bake for 22-26 minutes or until the center is relatively set and no longer jiggles. Remove from oven and cool completely at room temperature for 2 hours.
- Refrigerate for 1-2 hours until chilled. Lift out using parchment overhang. Dust with confectioners sugar and cut into squares before serving.
Notes
- For clean cuts, wipe knife between slices with damp cloth
- Use glass pan for even heating – metal alters cooking times
- Freeze bars without powdered sugar for better texture
- Prep Time: 10 min
- Cook Time: 40 min
- Category: Main Course
- Method: Baked
- Cuisine: American
Nutrition
- Calories: 209
- Sugar: 21g
- Sodium: 70mg
- Fat: 9g
- Carbohydrates: 30g
- Fiber: 0g
- Protein: 3g
Ingredients and Substitutions
Base Components
- Butter: Creates the crumbly shortbread texture
- Flour: Forms structure for both crust and filling
- Eggs: Thickens the lemon custard layer
- Lemons: Provides the signature citrus flavor
Flavor Enhancers
- Vanilla flavoring: Adds warmth to balance tartness
- Powdered sugar: Creates snowy finishing touch
For dietary considerations, gluten-free flour blends work well in both crust and filling. Those avoiding refined sugar can use coconut sugar in the crust. While fresh lemon juice delivers optimal flavor, bottled juice offers convenience during off-seasons.
How to Make Lemon Bars
Step 1: Prepare the Crust
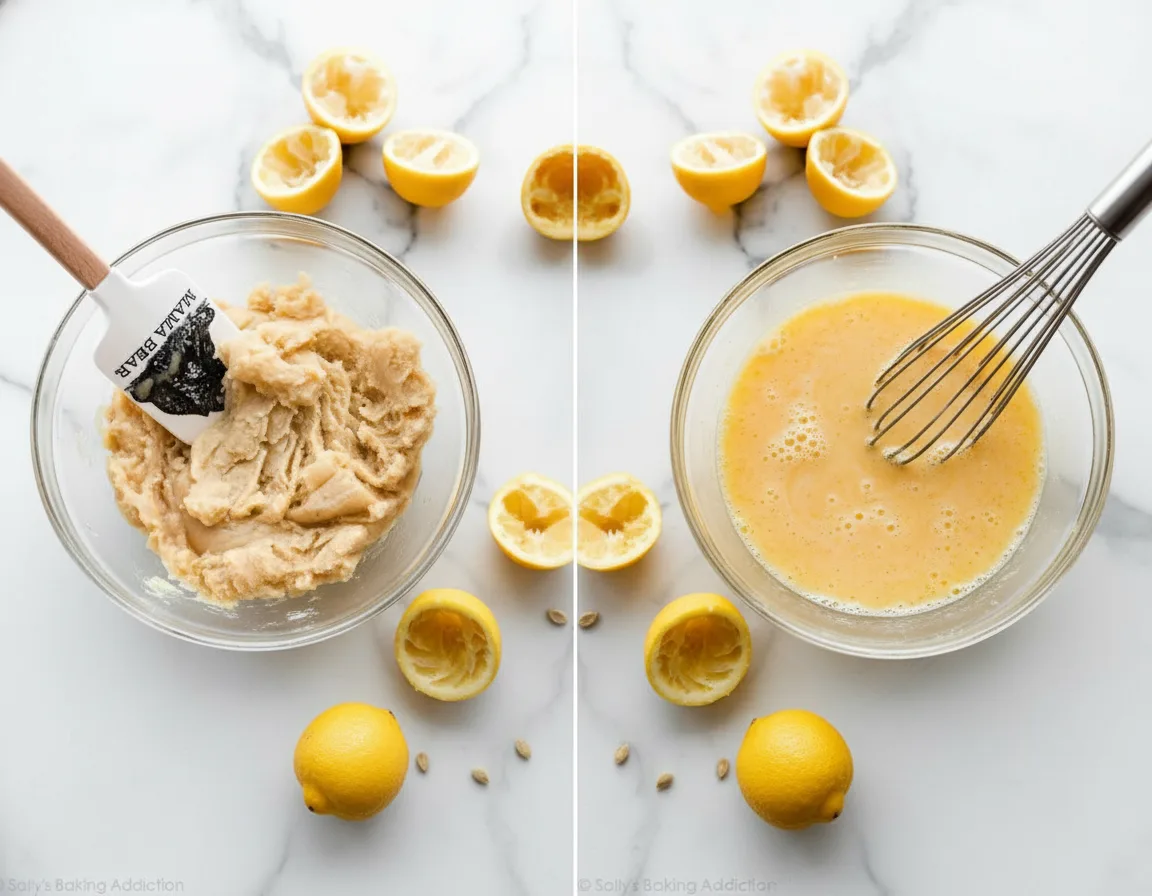
Begin by lining your baking pan with parchment paper wings for easy removal later. Mix melted butter with sugar until fully incorporated, then blend in vanilla flavoring. Gradually stir in flour until the dough comes together evenly. Press this mixture firmly into your prepared pan, creating compact corners for uniform baking.
Step 2: Bake and Prepare Crust
Bake the golden crust until lightly bronzed at the edges, about 22 minutes. Immediately after removing it from the oven, prick the surface strategically with a fork. This crucial step helps the lemon layer adhere better during final baking.
Step 3: Create Lemon Filling
While crust bakes, whisk together the sweetener and flour thoroughly to prevent lumps. Incorporate eggs one at a time until the mixture flows smoothly. Finally, stream in fresh lemon juice while continuously stirring to emulsify the custard base.
Step 4: Final Bake
Pour your vibrant yellow filling over the warm crust. Return the pan to the oven for 22-26 minutes until the center sets with minimal jiggle. Cooling completely before cutting prevents runny filling and ensures picture-perfect squares every time.
Pro Tips for Success
Experience reveals four professional techniques for superior lemon bars. First, sift dry ingredients together to avoid chalky flour pockets. Second, use room-temperature eggs for smoother incorporation. Third, cool the base completely before refrigeration to prevent condensation. Fourth, chill before cutting for cleaner slices.
Bakers should note that metal pans conduct heat differently than glass, potentially affecting cooking times. Always test doneness by gently shaking the pan rather than inserting utensils that might mar the surface. Combining these tricks produces bars worthy of any dessert table alongside toasty snacks.

Flavor Variations
These sunny treats easily adapt to new flavor dimensions. Passionfruit puree creates tropical flair when substituted for half the lemon juice. A thin layer of raspberry jam beneath the filling creates lovely layered desserts. For festive occasions, edible flowers pressed into the filling before chilling make eye-catching garnishes.
Serving Suggestions
Dust the cooled bars generously with powdered sugar using a fine-mesh sieve. Pair them with fresh berries or mint sprigs for color contrast. These make excellent portable desserts alongside finger foods at gatherings. During summer months, serve lemon bars with iced tea or lemonade for complementary flavors.
Storage and Freezing Instructions
Store lemon bars in an airtight container for up to one week, placing parchment between layers to prevent sticking. For extended storage, freeze individual bars wrapped tightly in plastic, then plunge them into freezer bags. Thaw overnight in the refrigerator before serving for best texture preservation.
Nutrition Facts per Serving
| Calories | Fat | Carbs | Protein | Fiber | Sugar | Sodium |
|---|---|---|---|---|---|---|
| 209 | 9g | 30g | 3g | 0g | 21g | 70mg |
FAQs About Lemon Bars
Can I use bottled lemon juice?
While fresh lemons deliver superior brightness, bottled juice works acceptably. Reduce sugar slightly as bottled juice often lacks fresh lemon’s complexity.
Why is my filling bubbling?
Overmixing introduces excess air into the custard. Gently fold ingredients until just combined to maintain smooth surfaces.
Can I freeze lemon bars with powdered sugar?
Freeze without powdered sugar, then dust after thawing. The sugar dissolves during freezing, creating sticky surfaces.
How do I prevent soggy crust?
Pricking the warm crust creates texture for filling adhesion. Ensure crust cools slightly before adding filling to prevent steam-related sogginess.
Why intense egg flavor?
Overbaking causes sulfurous egg notes. Remove pans when centers still have slight movement for proper doneness.
Final Thoughts
These classic lemon bars capture the essence of sunshine in dessert form. Their cheerful yellow hue and powdered sugar snowfall create instant visual appeal. The recipe’s straightforward preparation makes it accessible to novice bakers yet respected by professionals. Whether impressing guests or treating yourself to a sweet moment, these bars deliver citrusy joy with every tangy bite.