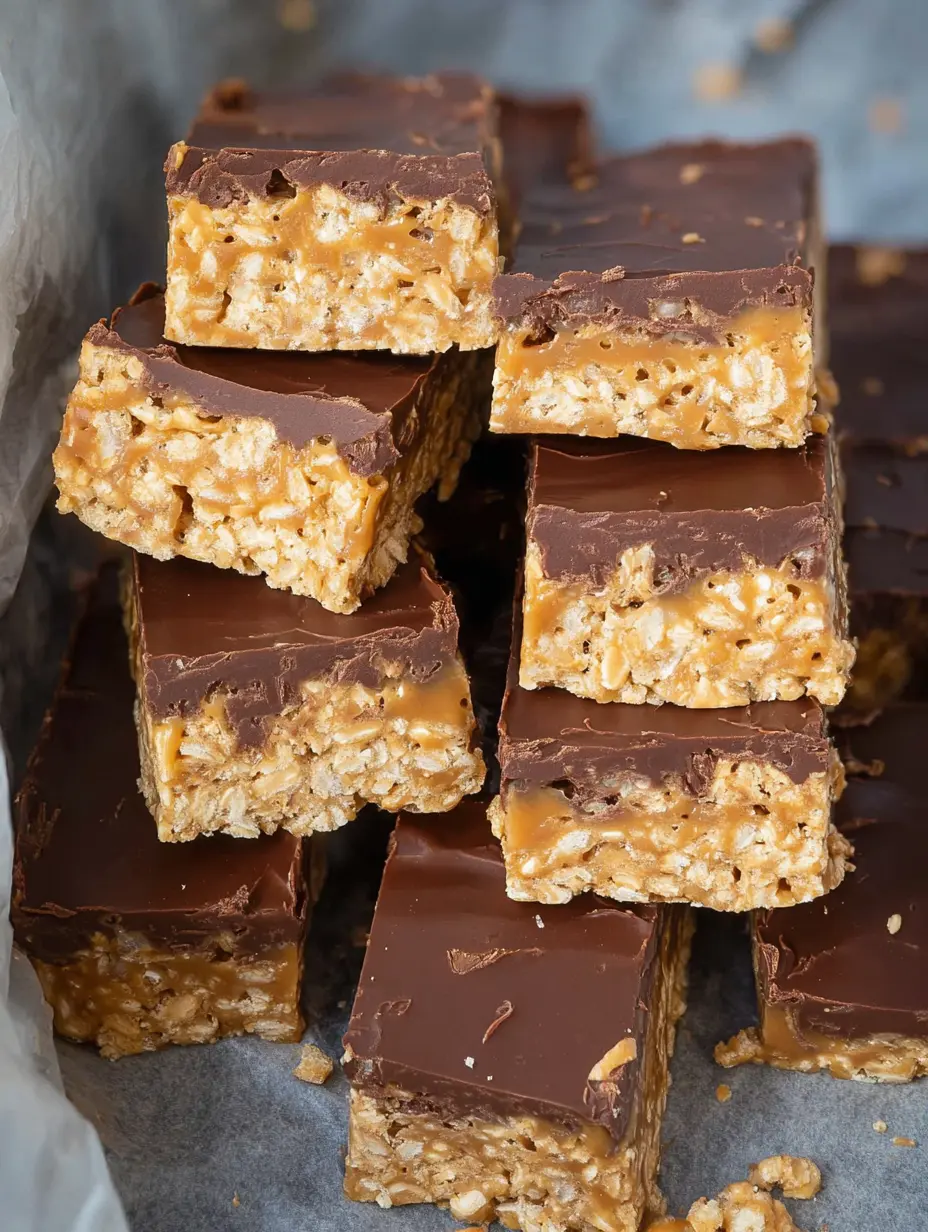
Every sweet tooth dreams of that perfect treat: something irresistibly creamy, delightfully crunchy, and satisfyingly sweet. Enter the Peanut Butter Crunch Bar, a no-bake dessert that masterfully combines rich peanut butter with crispy cereal and a smooth chocolate topping. This recipe delivers an explosion of textures and flavors in every bite, making it an ideal homemade snack for parties, lunchboxes, or a simple afternoon indulgence.
Best of all, it requires minimal effort and time, proving that incredible desserts don’t need to be complicated.
Why This Recipe is a Crowd-Pleaser
What sets these crunch bars apart is their flawless textural harmony. The creamy, nutty base provides a decadent foundation, while the rice cereal introduces a light, crispy contrast that prevents the bar from being overly dense. The final layer of chocolate adds a professional finish, sealing in all the flavors.
This recipe is incredibly versatile; you can use creamy or crunchy peanut butter, dark or milk chocolate, and even add mix-ins like chopped nuts or dried fruit. It’s a forgiving formula that yields consistently delicious results, perfect for both novice bakers and seasoned pros looking for a quick win.
A Deep Dive into Key Ingredients & Substitutions
Understanding your ingredients is the first step to baking success. Each component in this recipe plays a specific role in creating the final texture and taste.
The Star: Peanut Butter
Peanut butter is the heart of this recipe, providing the primary flavor and binding the bars together. For the best results, use a standard commercial creamy peanut butter. Natural peanut butters, which often separate, can make the base too oily and less stable.
The natural oils in peanut butter blend perfectly with the other ingredients to create a firm yet melt-in-your-mouth layer.
Sweeteners and Binders: Honey and Butter
Honey acts as a natural sweetener and binder, adding a subtle floral note that complements the peanut butter. Its sticky quality is essential for holding the cereal together. The unsalted butter enriches the flavor and contributes to a smooth, cohesive mixture. For a dairy-free version, a high-quality plant-based butter can be used as a direct substitute.
The Crispy Element: Rice Cereal
The signature ‘crunch’ comes from plain, crispy rice cereal. It’s important to add the cereal after the hot mixture has cooled slightly to maintain its crispness. Stir gently to avoid crushing the pieces. This ingredient is what transforms the bar from a fudge-like consistency into a delightful textured treat.
The Finishing Touch: Chocolate Topping
A thin layer of chocolate crowns these bars, adding a touch of elegance and a complementary flavor. Using a neutral-tasting oil like coconut or vegetable oil (optional) when melting the chocolate helps create a more flexible topping that cuts cleanly without shattering. You can use chocolate chips or a bar chopped into pieces.
Step-by-Step Instructions for Flawless Bars
Follow these detailed steps to ensure your peanut butter crunch bars set perfectly and slice cleanly.
Step 1: Preparation and Lining
Begin by lining an 8×8 inch square baking pan with parchment paper, leaving some overhang on two sides. This ‘sling’ makes removing the entire set block effortless and is the key to easy cleanup. Ensure the paper is smoothed into the corners.
Step 2: Melting the Base
In a medium saucepan over medium heat, combine the peanut butter, honey, and butter. Stir constantly as the mixture melts and begins to bubble gently. Let it simmer for 1-2 minutes; this brief cooking time helps the ingredients fully integrate and removes any raw honey flavor.
Remove from heat and allow it to cool for 3-4 minutes. This cooling step is crucial before adding the cereal.
Step 3: Incorporating Dry Ingredients
Stir the powdered sugar into the warm peanut butter mixture until fully dissolved and smooth. Then, gently fold in the crispy rice cereal until every piece is evenly coated. Be careful not to overmix and crush the cereal.
Step 4: Pressing and Initial Chill
Transfer the mixture to your prepared pan. Using a silicone spatula or the back of a metal spoon, press the mixture firmly and evenly into the pan, reaching all corners. Place the pan in the refrigerator to firm up while you prepare the chocolate. This chill helps the base set, preventing it from mixing with the chocolate layer.
Step 5: Melting the Chocolate
Place your chocolate pieces in a microwave-safe bowl. Microwave in 30-second intervals, stirring well after each burst, until the chocolate is almost entirely melted. The residual heat will finish the job. For a smoother, more sliceable topping, stir in half a teaspoon of a neutral oil at this stage. This is an optional but recommended step.
Step 6: Adding the Topping and Final Set
Pour the melted chocolate over the chilled base. Tilt the pan or use your spatula to spread it into a thin, even layer. Return the pan to the refrigerator and let the bars set completely for at least 30 minutes, or until the chocolate is firm to the touch.
Step 7: The Art of Slicing and Storage
Lift the entire block out of the pan using the parchment paper overhang. Place it on a cutting board. For pristine, crack-free slices, run a large, sharp knife under hot water, wipe it dry, and make a swift, confident cut.
Repeat the heating and wiping for each cut. Store the bars in an airtight container in the refrigerator for up to 4 days. For longer storage, freeze them for 1-2 months; they thaw beautifully.
Expert Tips & Tricks for Next-Level Bars
- For a Salted Caramel Twist: Sprinkle a pinch of flaky sea salt over the wet chocolate layer before chilling.
- Add-In Ideas: Fold 1/4 cup of mini chocolate chips, chopped peanuts, or even crushed pretzels into the base mixture with the cereal for extra texture.
- Perfect Slicing: If your chocolate cracks when cutting, your knife wasn’t hot enough or the chocolate was too cold. Let the block sit at room temperature for 5 minutes before slicing.
- Double the Batch: This recipe doubles perfectly for a 9×13 inch pan, making it ideal for larger gatherings.
Understanding the Nutritional Profile
Being mindful of what we eat is important, even when enjoying treats. Below is a detailed breakdown of the nutritional content per serving of these Peanut Butter Crunch Bars, based on a yield of 16 squares.
| Nutrient | Amount Per Serving |
|---|---|
| Calories | 197 kcal |
| Total Fat | 15 g |
| Carbohydrates | 16 g |
| Protein | 4 g |
| Dietary Fiber | 1 g |
| Total Sugars | 11 g |
| Sodium | 108 mg |
This treat provides a satisfying balance of protein from the peanut butter and carbohydrates for energy. The sugar content primarily comes from the honey and chocolate, making it a dessert best enjoyed in moderation as part of a balanced diet.
Serving and Occasion Ideas
Peanut Butter Crunch Bars are incredibly versatile. Serve them as a sweet ending to a casual dinner, pack them in school or work lunches for a midday boost, or arrange them on a platter for potlucks and bake sales. They pair wonderfully with a glass of cold milk or a cup of coffee. For a festive touch, drizzle melted white chocolate over the top in a zigzag pattern before serving.
Looking for more crowd-pleasing desserts? Explore our recipe for Simple Chocolate Cupcakes for Parties, which are always a hit.
Frequently Asked Questions
Can I freeze these bars?
Absolutely! These bars freeze exceptionally well. Layer them between sheets of parchment paper in an airtight container and freeze for up to 2 months. Thaw in the refrigerator or at room temperature for 30 minutes before serving.
What can I substitute for honey?
If you prefer not to use honey, maple syrup or agave nectar are excellent one-to-one substitutes. The flavor will vary slightly, but the bars will still set properly.
Are these bars gluten-free?
Yes, provided you use a certified gluten-free crispy rice cereal. Always check the packaging of your specific brand to be sure.
Why does my chocolate topping crack when I cut the bars?
Chocolate can become brittle when very cold. Using the hot knife technique described above is the best solution. Adding a small amount of oil to the chocolate when melting also increases its flexibility.
More Easy & Delicious Recipes to Try
If you loved the simplicity and satisfying crunch of these bars, you’ll adore our other straightforward recipes. For a warm, fruity dessert, our Warm Strawberry Cobbler-Style Crumble is a must-try. Or, for a savory side dish that’s always requested at gatherings, master our Traditional Broccoli Salad with Creamy Dressing.
Final Thoughts
Creating homemade Peanut Butter Crunch Bars is a rewarding experience that yields a delicious, shareable treat. With their perfect contrast of creamy, crispy, and chocolatey elements, they are guaranteed to satisfy any craving. This recipe’s flexibility and no-bake nature make it a staple you’ll return to again and again.
So, gather your simple ingredients and prepare to make a dessert that will earn you rave reviews from family and friends alike. Happy baking!
Recipe
Print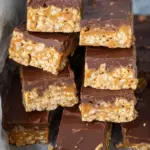
Peanut Butter Crunch Bars
- Total Time: 15 min
- Yield: 16 servings 1x
Description
Irresistible no-bake bars with a creamy peanut butter & crispy cereal base, topped with smooth chocolate. The perfect easy homemade treat.
Ingredients
1 cup peanut butter
¼ cup butter (unsalted)
¼ cup honey
¼ cup powdered sugar (icing sugar)
1½ cups crispy rice cereal
5½ ounces chocolate (dark, milk, or about ¾ cup chocolate chips)
Instructions
- Line an 8×8 inch pan with parchment paper.
- Melt peanut butter, honey, and butter in a saucepan over medium heat. Simmer 1-2 min, then cool slightly.
- Stir in powdered sugar, then gently fold in crispy rice cereal.
- Press mixture firmly into prepared pan. Chill in fridge.
- Melt chocolate in microwave in 30-sec intervals. Stir in ½ tsp oil (optional).
- Pour melted chocolate over chilled base, spread evenly. Chill until fully set (min 30 min).
- Lift from pan, cut into bars with a hot knife for clean slices.
Notes
- Use a hot, clean knife for perfect cuts without cracking the chocolate.
- Store in an airtight container in the fridge for up to 4 days, or freeze for 1-2 months.
- For variations, add mini chocolate chips, chopped nuts, or a sprinkle of sea salt.
- Prep Time: 15 min
- Category: Main Course
- Method: Baked
- Cuisine: American
Nutrition
- Calories: 197 kcal
- Sugar: 11 g
- Sodium: 108 mg
- Fat: 15 g
- Carbohydrates: 16 g
- Fiber: 1 g
- Protein: 4 g